WB6 root password recovery/en: различия между версиями
(Новая страница: «==The procedure for recovering the root password on the Wiren Board 6 controller== # Connect to the debug port of the Wiren Board 6 control…») |
|||
| Строка 4: | Строка 4: | ||
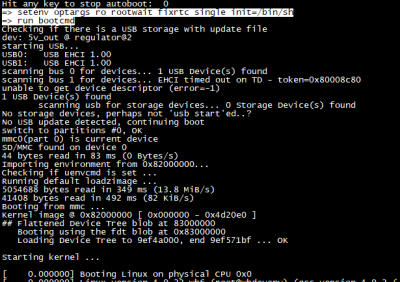
[[File:Stop_autoboot_commands_6.png|thumb | 400px|Stop_autoboot_commands.png| Entering commands]] | [[File:Stop_autoboot_commands_6.png|thumb | 400px|Stop_autoboot_commands.png| Entering commands]] | ||
== | ==The procedure for recovering the root password on the Wiren Board 6 controller== | ||
# | # Connect to the debug port of the [[Wiren Board 6/en| Wiren Board 6]] controller (via microUSB-connector Debug Console). The connection is described in detail on the [[Debug_UART/en|Debug UART]] page. | ||
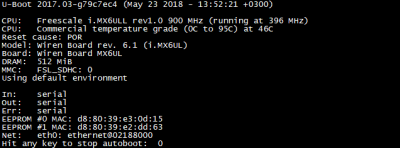
# | # Turn on the power of the controller (the controller indicator lights green continuously) and when a message "Hit any key to stop autoboot:" appears with the selected countdown in the UART console, then press any key. | ||
# | # In response to the command line prompt <code>=></code> sequentially enter the command:<br/><code>setenv optargs ro rootwait fixrtc single init=/bin/sh</code><br/><code>run bootcmd</code><br/> If you do not enter commands, watchdog restarts the controller. | ||
# | # After downloading (the indicator of the controller lights up red continuously), we obtain a system prompt <code>#</code> | ||
# | # Mount the root filesystem<br/><code>mount -n -o remount,rw /dev/mmcblk0p2 /</code><br/> and we get the message <code> EXT4-fs (mmcblk0p2): re-mounted. Opts: (null)</code> | ||
# | #Mount the partition from the configuration backup:<br/><code>mount /dev/mmcblk0p6 /mnt/data</code><br/>and we get the message <code>EXT4-fs (mmcblk0p6): mounted filesystem with ordered data mode. Opts: (null)</code> | ||
# | #Enter <code>passwd</code> and change password. Successful password change: <code>passwd: password updated successfully</code> | ||
# | # Copy the new password to the section from the configuration backup:<br/><code>cp /etc/shadow /mnt/data/etc</code> | ||
# | # Unmount both file systems:<br/><code> # sync</code><br/><code> # umount /mnt/data</code><br/><code> # umount /</code> | ||
# | # Turn off and turn on the power again. The password is changed. | ||
Версия 13:37, 12 июня 2019
The procedure for recovering the root password on the Wiren Board 6 controller
- Connect to the debug port of the Wiren Board 6 controller (via microUSB-connector Debug Console). The connection is described in detail on the Debug UART page.
- Turn on the power of the controller (the controller indicator lights green continuously) and when a message "Hit any key to stop autoboot:" appears with the selected countdown in the UART console, then press any key.
- In response to the command line prompt
=>sequentially enter the command:setenv optargs ro rootwait fixrtc single init=/bin/shrun bootcmd
If you do not enter commands, watchdog restarts the controller. - After downloading (the indicator of the controller lights up red continuously), we obtain a system prompt
# - Mount the root filesystem
mount -n -o remount,rw /dev/mmcblk0p2 /
and we get the messageEXT4-fs (mmcblk0p2): re-mounted. Opts: (null) - Mount the partition from the configuration backup:
mount /dev/mmcblk0p6 /mnt/data
and we get the messageEXT4-fs (mmcblk0p6): mounted filesystem with ordered data mode. Opts: (null) - Enter
passwdand change password. Successful password change:passwd: password updated successfully - Copy the new password to the section from the configuration backup:
cp /etc/shadow /mnt/data/etc - Unmount both file systems:
# sync# umount /mnt/data# umount / - Turn off and turn on the power again. The password is changed.

